Mac os x malware removal how to prevent flashback how to get rid of flashbacks how to remove flash how to remove flash how to remove background from image how to remove password from windows 10 how to clear cache

How to remove the Flashback malware from OS X
While OS X was relatively void of malware for the first 10 years of use, recently malware scares have cropped up that have affected a significant number of Mac systems.
One of the first was the MacDefender fake antivirus scam, which had people issuing credit card information out of fear their systems were infected. This scam morphed quite rapidly as it tried to avoid detection and continue coercing people to offer personal information. Another scam was the DNSChanger malware that affected millions of PC systems worldwide, and which ultimately directed affected systems to malicious Web sites, and like the MacDefender malware tried to get people to offer personal information.
The latest malware to hit OS X has been the Flashback scam, which initially started as a fake Flash player installer application that was relatively easy to avoid. However, the threat quickly morphed into a more serious threat by taking advantage of unpatched security holes in Java (which Apple has since addressed) to install on a Mac running Java by merely visiting a malicious Web page and not requiring any user attention. So far, it is estimated to have infected over 600,000 Mac systems worldwide, with the majority in the U.S. and Canada.
How does it work?
The Flashback malware injects code into applications (specifically Web browsers) that will be executed when they run, and which then send screenshots and other personal information to remote servers.
First step: Exploiting Java
When you encounter the malicious Web page containing the malware and have an unpatched version of Java running on your system, it will first execute a small Java applet that when run will break the Java security and write a small installer program to the user's account. The program is named something like .jupdate, .mkeeper, .flserv, .null or .rserv, and the period in front of it makes it appear hidden in the default Finder view.
In addition, the Java applet will write a launcher file named something like "com.java.update.plist", "com.adobe.reader.plist", "com.adobe.flp.plist" or even "null.plist" to the current user's ~/Library/LaunchAgents/ folder, which will continually launch the .jupdate program whenever the user is logged in.
In order to avoid detection, the installer will first look for the presence of some antivirus tools and other utilities that might be present on a power user's system, which according to F-Secure include the following:
/Library/Little Snitch
/Developer/Applications/Xcode.app/Contents/MacOS/Xcode
/Applications/VirusBarrier X6.app
/Applications/iAntiVirus/iAntiVirus.app
/Applications/avast!.app
/Applications/ClamXav.app
/Applications/HTTPScoop.app
/Applications/Packet Peeper.app
If these tools are found, then the malware deletes itself in an attempt to prevent detection by those who have the means and capability to do so. Many malware programs use this behavior, as was seen in others such as the Tsunami malware bot.
Second step: Downloading the payload
When the jupdate program executes, it will connect to a remote server and download a payload program that is the malware itself, and which consists of two components. The first is the main part of the malware that performs the capture and upload of personal information, and the second is a filter component that is used to prevent the malware from running unless specific programs like Web browsers are being used.
Third step: Infection
Once the malware and the filter are downloaded, the malware is run to infect the system. This is where users will see an alert about a software update and will be prompted to supply their passwords. Unfortunately at this point there is nothing to stop the infection, and whether or not a password is supplied only changes the mode of infection.
The root of the infection routine is based around hijacking configuration files in OS X that are read and executed when programs are run. One of these is called "Info.plist" located in the "Contents" folder within each OS X application package, and is read whenever that specific program is opened. The second is called "environment.plist" and is located within the user account in a hidden folder (~/.MacOSX/environment.plist), which can be used to launch parameters whenever any programs are opened by the user.
The first mode of infection is if a password is supplied, in which case the malware alters the Info.plist files in Safari and Firefox to run the malware whenever these programs are opened. This is the malware's preferred mode of infection, but if a password is not supplied, then the malware resorts to its second mode of infection, where it alters the "environment.plist" file.
By using the environment.plist file, the malware will run whenever any application is opened, and this will lead to crashes and other odd behavior that might cause alarm to the user, so the malware then uses its filter component to only run when certain applications are launched, such as Safari, Firefox, Skype, and even Office installations.
Either way, once downloaded the malware will infect the system using one of these approaches and will run whenever target applications like Web browsers are used. In more recent variants of the malware, when installed using the "environment.plist" file it will further check the system to ensure complete installations of programs such as Office or Skype are present, and potentially delete itself if these programs are not fully or properly installed. F-Secure speculates this is an attempt to prevent early detection of the malware.
How do I detect it?
Detecting the malware is fairly easy, and requires you simply open the Terminal application in the /Applications/Utilities/ folder and run the following commands:
defaults read ~/.MacOSX/environment DYLD_INSERT_LIBRARIES
defaults read /Applications/Safari.app/Contents/Info LSEnvironment
defaults read /Applications/Firefox.app/Contents/Info LSEnvironment
These commands will read the "Info.plist" file of some target applications, and the "environment.plist" file in the user account, and determine if the variable used by the malware to launch itself (called "DYLD_INSERT_LIBRARIES") is present. If the variable is not present, then these three Terminal commands will output that the default pair "does not exist," but if they are present then these commands will output a path that points to the malware file, which you should see in the Terminal window.
In addition to the above commands, you can check for the presence of invisible .so files that past variants of the malware create in the Shared user directory by running the following command in the Terminal:
ls -la ~/../Shared/.*.so
After running this command, if you see an output of "no such file or directory" then you do not have these files in your user shared directory; however if they are present then you will see them listed.
How do I remove it?
If after running the first three detection commands you find that your system does contain the modified files and you suspect it has the malware installed, then you can go about removing it using F-Secure's manual removal instructions. These instructions are a bit in-depth, but if you follow them exactly, then you should be able to rid the system of the infection:
- Open the Terminal and run the following commands (the same as above):
defaults read /Applications/Safari.app/Contents/Info LSEnvironment
defaults read /Applications/Firefox.app/Contents/Info LSEnvironment
defaults read ~/.MacOSX/environment DYLD_INSERT_LIBRARIES
When these commands are run, make a note of the full file path that is output to the terminal window (it may be paired with the term "DYLD_INSERT_LIBRARIES"). For each of the commands that output a file path (and do not say the domain pair does not exist), copy the full file path section and the run the following command with the file path in place of FILEPATH in the command (copy and paste this command):
grep -a -o '__ldpath__[ -~]*' FILEPATH
- Locate the files mentioned in the output of the above commands, and delete them. If you cannot locate them in the Finder, then for each first type "sudo rm" in the terminal followed by a single space, and then use your mouse cursor to select the full file path from the first command's output, and use Command-C followed by Command-V to copy and paste it back into the Terminal. Then press Enter to execute the command and remove this file.
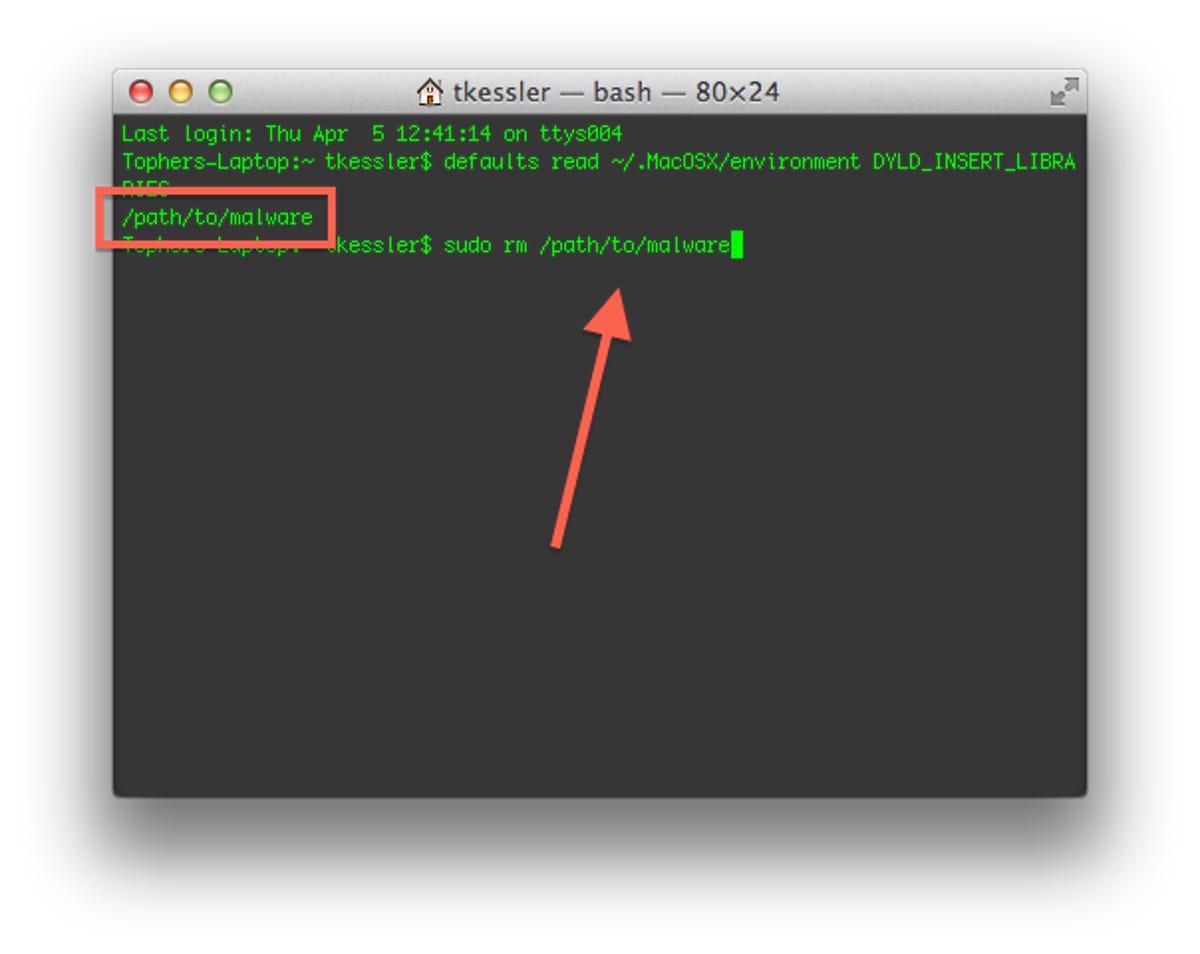
See the following screenshot for an example of how this should look:

After running the command and revealing the path to the malware file, copy the path to the "sudo rm" command on a new line as is shown here to have the system delete it. Screenshot by Topher Kessler/CNET - When you have deleted all the files references by the "defaults" commands above, then you have removed the malware files, but you still need to reset the altered applications and account files, so to do this run the following commands:
sudo defaults delete /Applications/Safari.app/Contents/Info LSEnvironment
sudo chmod 644 /Applications/Safari.app/Contents/Info.plist
sudo defaults delete /Applications/Firefox.app/Contents/Info LSEnvironment
sudo chmod 644 /Applications/Firefox.app/Contents/Info.plist
defaults delete ~/.MacOSX/environment DYLD_INSERT_LIBRARIES
launchctl unsetenv DYLD_INSERT_LIBRARIES
- In the Finder, go to the Go menu and select Library (hold the Option key in Lion to reveal this option in the menu), and then open the LaunchAgents folder, where you should see a file named something like "com.java.update.plist." Next, type the following command into the Terminal (Note: change the name of "com.java.update" in the command to reflect the name of the file before its .plist suffix, such as "com.adobe.reader" if you have that file):
defaults read ~/Library/LaunchAgents/com.java.update ProgramArguments
When this command is completed, press Enter and note the file path that has been output to the Terminal window.
As you did previously, locate this file in the Finder and delete it, but if you cannot do so then type "sudo rm" followed by a single space, and then copy and paste the output file path into the command and press Enter.
-
To remove any hidden .so files found earlier, you can remove them by running the following command in the Terminal (be sure to copy and paste this command, as there should be absolutely no spaces in the last component that contains the symbols and punctuation marks):
sudo rm ~/../Shared/.*.so
After this step is complete, remove the file called "com.java.update.plist" (or "com.adobe.reader.plist" and you should be good to go.
UPDATED: 4/5/2012, 10:00pm -- Added detection and removal instructions of hidden .so files used by prior variants of the malware.
Questions? Comments? Have a fix? Post them below or e-mail us!
Be sure to check us out on Twitter and the CNET Mac forums.
Source
Popular Posts
-
 Jadwal kereta api pasundan harian, jadwal kereta api pasundan harissa, jadwal kereta api pasundan harita, jadwal kereta api pasundan haribo,...
 -
Kereta pertama dari bogor ke jakarta kota metropolitan, kereta pertama dari bogor ke jakarta kota terpadat, kereta pertama dari bogor ke jak...
-
 Kereta myvi, kereta myvi baru, kereta myvi terpakai kedah 2018, Perodua Myvi Pink Le Motorkarok Blogspot via motorkarok.blogspot.com ...

